Introduction to HTML
Get started with HTML and play around with its basics language features.
We will be starting by understanding where HTML is used. First of all, let’s perform this simple exercises
Exercise: Load the URL
- Open the browser.
- Enter url https://gorkha.dev
- Open the Developer tools. (See how instructor is doing or Google it)
- Under the
Networktab, click on row(mostly 1st row) havingNameasgorkha.dev.- Notice the details under
Headerstab.Result
// General
Request URL: https://gorkha.dev/
Request Method: GET
Status Code: 304
Remote Address: 185.199.110.153:443
Referrer Policy: strict-origin-when-cross-origin

// Response Headers
...
content-length: 3732
content-type: text/html; charset=utf-8
server: GitHub.com
...

// Request Headers
:authority: gorkha.dev
:method: GET
:path: /
:scheme: https
accept: text/html
...
user-agent: Mozilla/5.0
Instructor
Explain basic of Client-Server model, HTTP methods, status codes, user-agent and other important details.
What is URL
A URL stands for Uniform Resource Locator, also termed a Web Address, is a reference to a web resource that represents its location on a internet. Read more.

Instructor
Explain protocol, domain, TLD and path.
What is HTML
- HTML stands for HyperText Markup Language.
- It is the standard markup language for creating Web pages.
- It describes the structure of a Web page.
- HTML elements tell the browser how to display the content.
What is CSS
- CSS stands for Cascading Style Sheets.
- It is the standard markup language for creating Web pages.
- It describes how the web page should be displayed(UI).
- It describes how elements should be rendered on screen, on paper, in speech, or on other media.
- HTML elements tell the browser how to display the content.
- Simply saying, CSS adds styling to the web page.
NOTE: The word Cascading means that a style applied to a parent element will also apply to all children elements within the parent.
Hello World
Type the following code in your editor and give the file name as hello.html.
NOTE: It is recommended to create a folder (say html-css-101) and keep all the examples
codes in it.
<!DOCTYPE html>
<html lang="en">
  <head>
    <title>Hello World</title>
  </head>
  <body>
    <h1>Hello World</h1>
    <p style="color: blue;">This is the first web page.</p>
  </body>
</html>
Open the hello.html file in browser. This can be done in two ways:
- Directly go to the file through
File Explorerand locate the folderhtml-css-101and right click to filehello.htmland click onopen in browser(see Open With). - Use the
Live Serverextension to open the file.
NOTE: Using Live Server to open file has benefit as the web page will be updated as we type.
Instructor
Explain the layout of the HTML web page,
lang="en",DOCTYPE, element and tag.
Comment
- Comment is used to explain the code which might be useful for self or for others.
- These are not displayed or rendered in the web page.
-
Syntax:
<!-- Write your comments here -->Headings
- Heading tags are used for titles and subtitles.
-
Headings are used by search engines to index the structure and content of web pages.
NOTE: Avoid using headings to make text Large or Bold. Use only for page headings only.
<h1>Heading 1</h1>
<h2>Heading 2</h2>
<h3>Heading 3</h3>
<h4>Heading 4</h4>
<h5>Heading 5</h5>
<h6>Heading 6</h6>
Exercise: Heading Sizes
<h1>Heading 1</h1>
<h2>Heading 2</h2>
<h3>Heading 3</h3>
<h4>Heading 4</h4>
<h5>Heading 5</h5>
<h6>Heading 6</h6>
Check the sizes of each heading.
Result
h1 2em 32px h2 1.5em 24px h3 1.17em 18.72px h4 1em 16px h5 0.83em 13.28px h6 0.67em 10.72px NOTE: The margin around headings is added by user-agent(browser).
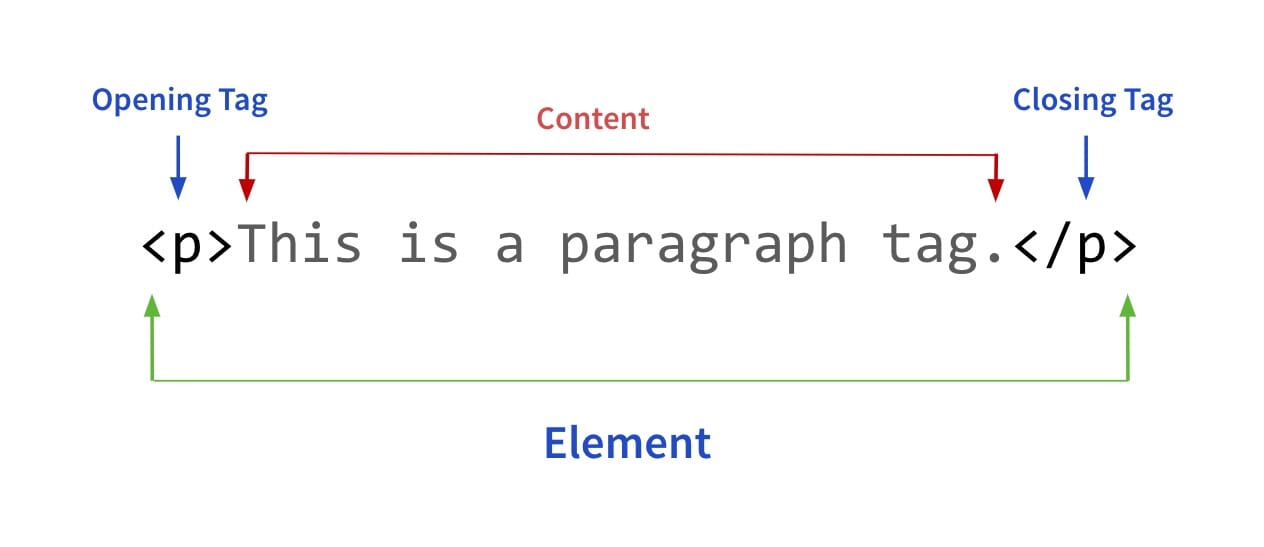
Paragraph
- Paragraph tag (
<p>) is used to define the paragraph. - Browsers automatically add margin around
<p>element. - Default font size is 1em.
-
<p>tag takes the whole width of the screen.<p> This is paragraph and contains multiple lines. </p>NOTE: The line in the output will be in one line although we have used two lines inside
<p>element.
Pre and Code tags
- The
<pre>tag is used to define the preformatted text. - The text will be displayed exactly as written in the HTML source code.
- The
<code>tag is used to define a piece of computer code. -
<pre>tag takes the whole width of the screen while<code>tag width is determined by its content.<pre style="background-color: #eee"> <code> // hello.c #include <stdio.h> int main() { printf("Hello, World!\n"); return 0; } </code> </pre>
Div and span
<div>is used to define a division or a section in Web page.<span>is used as an inline container to format or phrase part of a text, or a part of a document.- Both can styled with CSS or manipulated with JavaScript.
- There is no effect on the content or layout until styled using CSS.
-
The
<div>element takes the whole width of page while<span>element width is equal to the content inside it.<div style="background-color: #eee"> <h1>Section heading</h1> <p> This para is inside a 'div' and has span with <span style="color:blue">blue</span> word and nothing else. </p> </div>
Text formatting
Following are different kind of text formatting one can used in HTML.
Bold
- Both
<b>and<strong>tags are used for making text bold. <strong>has semantic meaning and indicates that its contents have strong importance.-
<b>is used to make text bold without any importance.<p>This text is normal.</p> <p><b>This text is bold.</b></p> <p><strong>This text is important.</strong></p>
Italic
- Both
<i>and<em>tags are used for making text italic. <i>tag is used to make the text italic. Used for technical term or phrase etc.-
<em>tag is used to emphasize the text.<p>This text is normal.</p> <p><i>This text is italic.</i></p> <p><em>This text is emphasized.</em></p>
Mark, Del and Insert
<mark>tag is used to mark or highlight the text.<del>tag is used to strike-through the text marking the part as deleted.-
<ins>is used to underline a text marking the part as inserted or added.<p>This text is <mark>marked</mark> here.</p> <p> <del>Blue</del> color deleted and <ins>Red</ins> is inserted. </p>
Small, Sub and Sup
<small>element is used to make the text smaller.<sub>element is used to defines a subscript text. Subscript text appears half a character below the normal line.-
<sup>element is used to defines a superscript text. Superscript text appears half a character above the normal line.<p>This line has <small>this phrase</small> small.</p> <p>H<sub>2</sub>O Formula has subscript</p> <p>Date 5<sup>th</sup> Nov 2021 has superscript</p>
Hyperlink
<a>tag is used to define hyperlink and it is a connection between one web resource to another.-
Syntax:
<a href="url" target="type">link text</a>where:
hrefattribute indicates link’s destination represented byurl.urlcan be any Web resource such image, audio, video, an HTML document or an element within an HTML document.- Click on
link textwill redirect the user to destinationurl. - The
targetattribute specifies where to open the linked document.
Example
<a href="https://gorkha.de">Gorkha Dev</a>Exercise: Open link in new tab
- Create a link and set url as
https://gorkha.dev/workshops/html-css-101/. - Give the
link textasHTML & CSS 101 Workshop. - See what happens.
- Now, give
target="_blank"attribute and see the behavior.
Image tag
<img>tag is used to embed (or insert) image in the HTML page.-
Syntax:
<img src="image-path.extension-name" alt="some text">where:
srcrepresents the path to the image (relative or absolute).altrepresents an alternate text which would be displayed if the image cannot be displayed.
NOTE: It is recommended to give styling of image through CSS. However, we can specify
heightandwidthfor the image.Example
<img src="images/html.png" alt="HTML" width="100">Exercise: Clickable image
- Create a link and set url as
https://gorkha.dev/workshops/html-css-101/. - Download the HTML logo image ( Click to download) and place inside
imagesfolder. - Instead of giving
link text, create a image inside the link and use above image.
Solution
<a href="https://gorkha.dev/workshops/html-css-101/">
  <img src="images/html.png" alt="HTML" width="100">
</a>
Inline vs Block element
- Two basic display types:
blockandinline. - Block level elements:
- Always starts on a new line.
- Always takes up the full width available until specified.
- Has a top and a bottom margin.
- Examples:
<div>, <p>, <h1>...<h6>, <main>etc
- Inline level element:
- Doesn’t not start from new line
- Only takes up width as necessary
- Examples:
<span>, <img>, <br>, <a>etc
<div style="border: 1px solid black">
  This "div" is a block level element.
</div>

Line after "div".
<p style="border: 1px solid black">
  This "p" is also a block level element.
</p>

Line after "p".
NOTE: Element
<p>add margin around it. See through Developer Tools. Also, the empty line after<div>will not be displayed by browser.
List
- List tags are used to a group related items in lists.
- Two common list tags are:
- Unordered List (
<ul>)- Each list item starts with
<li>tag and displayed as bullets by default. - Available list styles:
disc(default),circle,square
<ul style="list-style-type: square"> <li>HTML</li> <li>CSS</li> <li>JavaScript</li> </ul> - Each list item starts with
- Ordered List (
<ol>)- Each list item starts with
<li>tag and displayed as numbers by default. - Common list styles:
decimal(default),upper-alpha(A,B,C,..),lower-alpha(a,b,c,…),lower-roman(i,ii,iii,…)etc.
<ol style="list-style-type: upper-alpha"> <li>HTML</li> <li>CSS</li> <li>JavaScript</li> </ol> - Each list item starts with
- Unordered List (
Table
<table>element helps to arrange data into rows and columns.- Table row is defined with a
<tr>tag. - Table header is defined with a
<th>tag and the text are bold and centered. - Table data/cell is defined with a
<td>tag and the text are regular and left-aligned. -
<td>can contain all sorts of HTML elements: text, images, lists, other tables, etc.<table style="width: 300px;"> <tr> <th>Language</th> <th>First Release</th> </tr> <tr> <td>C</td> <td>1972</td> </tr> <tr> <td>JavaScript</td> <td>1996</td> </tr> </table> colspanattribute is used to make a cell span more than one column.rowspanattribute is used to make a cell span more than one row.-
<caption>tag is used to add a caption to a table.<table style="width:300px"> <caption>Language Details</caption> <tr> <th>Name</th> <th colspan="2">Contact</td> </tr> <tr> <td>BRG</td> <td>1234567890</td> <td>01 98765</td> </tr> </table>
Exercises
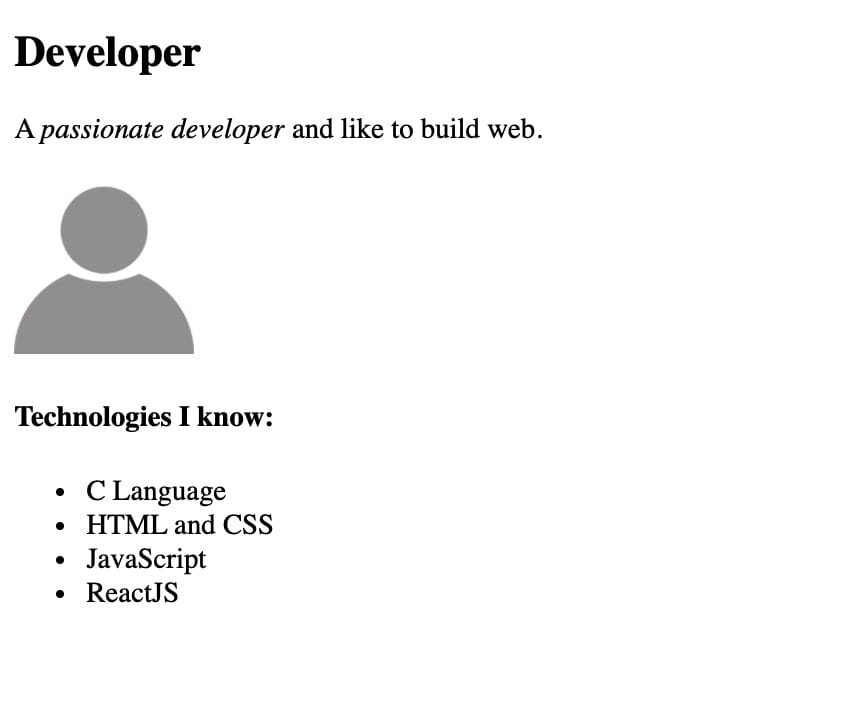
Developer Profile
Create a simple developer profile shown as below:
Starter Code
<!DOCTYPE html> <html lang="en"> <head> <title>Developer Profile</title> </head> <body> <div class="container"> <div class="header"> <!-- h2 --> <!-- p --> </div> <div class="main"> <!-- img (set width to 100) --> <!-- h4 --> <!-- ul --> </div> </div> </body> </html>NOTE: Download user image here (Click to download).
Daily Tracker
Create a simple daily tasks tracker as below:
Starter Code
<!DOCTYPE html>
<html lang="en">
  <head>
    <title>Daily Tracker</title>
  </head>
  <body>
    <div class="container">
      <div class="header">
        <!-- h2-->
        <!-- p-->
      </div>

      <div class="main">
        <!-- h2-->
        <!-- table -->
        <!--
          - Set style of table as 'background-color: #eee; width: 300px; text-align: center;'
          - Set th and td style s 'border: 1px solid #555;'
          - Set width of th as necessary
        -->
      </div>
    </div>
  </body>
</html>


Help me to improve Gorkha Dev.