Form and inputs from user
Learn to use form and get inputs from user
In this episode, we will learn common input elements that can be used to accept information from user.
These elements adds interactivity in the web page.
Forms
- The
<form>element is used to get input or information from user. - The user inputs are often sent to a server for processing.
- The
<form>element is used to create an HTML form in the web page. - The
<form>element acts as a container for different types of input elements like text fields, checkboxes, submit buttons etc. - The
actionattribute is used to specify the form handler. - The
methodattribute specifies the HTTP method to be used when submitting the form data. -
Syntax looks like below:
<form action="some url" method="method name">
  <!-- other form elements -->

  <input type="submit">
</form>
Following are different types of common input elements used in web page.
input element
- An
<input>element can be displayed in many ways which depends on thetypeattribute. -
It is the most used form element.
Type Description <input type="text">Displays a single-line text input field <input type="radio">Displays a radio button (for selecting one of many choices) <input type="checkbox">Displays a checkbox (for selecting zero or more of many choices) <input type="submit">Displays a submit button (for submitting the form) <input type="reset">Reset all form values to its default <input type="button">Displays a clickable button Example Snippets
Show example of different input types. Take help of following code snippets.
Code Snippets
<form action="/action" method=”post”> <h3>Choose Language</h3> <input type="radio" id="c" name="language" value="c"> <label for="c">C</label><br> <input type="radio" id="js" name="language" value="js"> <label for="js">JavaScript</label><br> <input type="radio" id="ruby" name="language" value="ruby"> <label for="ruby">Ruby</label><br><br> <h3>Choose Course</h3> <input type="checkbox" id="web" name="web" value="web"> <label for="web">Web Development</label><br> <input type="checkbox" id="prog" name="prog" value="prog"> <label for="prog">Programming</label><br><br> <input type="reset"> <input type="submit" value="Submit"> </form> - Check more about input elements in w3school.
label element
- The
<label>element defines a label for many form elements. - The
<label>element is useful for screen-reader users, as the screen-reader will read out loud the label when the user focus on the input element. -
The
forattribute of the<label>tag should be equal to theidattribute of the<input>element to bind them together.Example
Login Page
<form action="/login" method="post">
 <label for="username">Username:</label><br>
 <input type="text" id="username" name="username"><br>
 <label for="pwd">Password:</label><br>
 <input type="password" id="pwd" name="pwd">
 <input type="submit" value="Submit">
</form>
NOTE: The
nameattribute is must ininputelement else the value of input field will not be sent to server.
Select element
- The
<select>element is used to define a drop-down list. - The
<option>elements defines an option that can be selected. - By default, the first item in the drop-down list is selected.
- Use selected attribute to define a pre-selected option.
sizeattribute can be used to specify the number of visible values at once.-
multipleattribute can be used to allow the user to select more than one value.Example Snippets
Show example of different kind of select element. Take help of following code snippets.
Code Snippets
<select name="language">
  <option value="c">C</option>
  <option value="ruby">Ruby</option>
  <option value="javascript">JavaScript</option>
</select>

<select name="language">
  <option value="c">C</option>
  <option value="ruby" selected>Ruby</option>
  <option value="javascript">JavaScript</option>
</select>

<select name="language" size="3">
  <option value="c">C</option>
  <option value="ruby">Ruby</option>
  <option value="javascript">JavaScript</option>
  <option value="java">Python</option>
  <option value="java">Java</option>
</select>
NOTE: Use
multipleattribute in the last example and notice what happens.
Textarea
<textarea>element defines a multi-line input field.rowsattribute specifies the number of lines in a text area.-
colsattribute specifies the width of a text area.<textarea name="message" rows="10" cols="30"> The web is awesome.</textarea> - It is recommended to use CSS to define the styling of
textarea. We can definewidthandheightthrough CSS.
Exercises
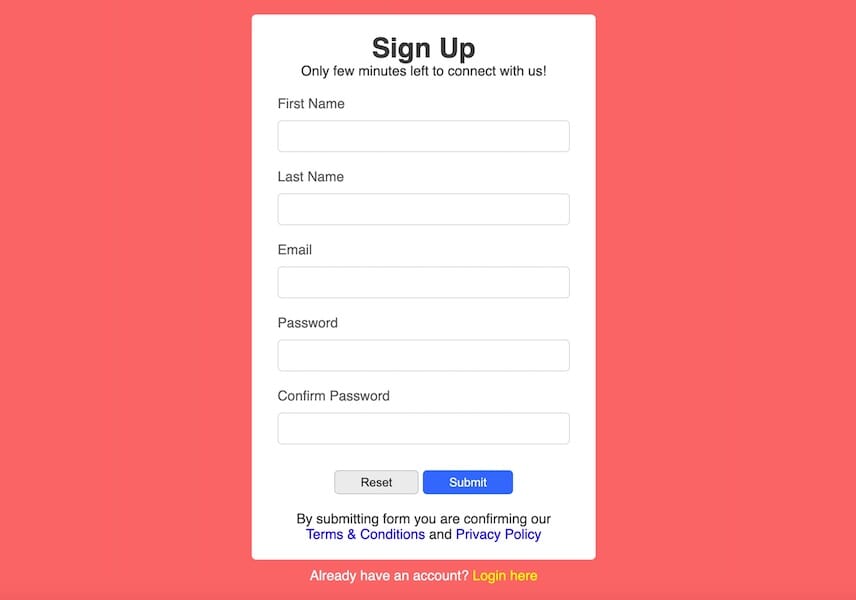
Exercise: Sign Up Styling
- Open the CodePen link.
- Click on
Forklink at the bottom right corner.- Update the CSS panel as per the instructions given.
Output preview
The web page should look like below:


Help me to improve Gorkha Dev.